
The Zazen-Posture
This text is an excerpt from my book The Secret Book of Zen.
(Note: The images shown here were taken exclusively for this website © 2011 Jan Hendriksson, publication and duplication not allowed)
The Zazen posture
Since you now know the preparatory rituals of Zen, it is time to address the actual Zen meditation. In Zen, meditation is done in the so-called zazen posture. The word zazen means sitting meditation, and refers to precisely the meditation position typical in Zen. The zazen posture is a special, completely motionless position. If you sit in the correct position, it leads to a total stillness of the body. The stillness of the body in turn leads to a stillness of the mind. If you keep your body still and do not stimulate it by movement, it transmits no stimuli which can interfere with meditation. Later, after satori, you can enter a meditative state in every imaginable position, be it jogging, cycling, driving a car, sitting or lying down. However, initially you should learn to bring your body under control so that you can meditate with some effectiveness. For this reason, the correct posture is essential to achieve good results in zazen. For this, you ideally sit on the floor on a zabuton and a zafu so that your hips are higher than your knees. This establishes a stable, integrated body posture. You breathe directly into your lower abdomen, which is where the spiritual centre of the human body is located. It can take weeks or months before you have learned to adopt the correct posture and to maintain it as well without problems during the meditation session. You should adapt from the outset to the pain which may occur, especially in the beginning. Our bodies are simply not accustomed to sitting on the floor for long periods of time.
The complete zazen posture is a combination of the following correct postures: sitting, head, hands, gaze and breath.
The zazen posture will seem strange and peculiar to you initially. You will be paying the most attention to your posture, and will perhaps not be able to focus on anything else. That is intended to be the case. The fact that you repeatedly check your posture will lead in time to this posture physically becoming second nature to you. At the same time, you are practicing your body mindfulness in this way. Paying attention to the correct posture is already a kind of meditation, and it sharpens your senses.
Topic: Tanden
In Zen, the human belly is called the tanden. If you are sitting in the right posture, you will automatically feel your body’s center of gravity and focus your attention on it. The body’s center of gravity is the tanden, namely the abdomen. It begins at approximately navel height and extends downwards. If you deviate only an inch or less from the proper posture, you will no longer be correctly focusing your attention on the tanden. If you focus your attention properly on the tanden, you will clear your mind completely. The reason is that neural pathways in the lower abdomen run along the back of the spine and up to the head. If you focus your attention correctly on the tanden, this stimulation will be transmitted to your brain. Your consciousness will suddenly clear up.
If you deviate from correctly focusing your attention on the tanden, you will feel tired and your thoughts will begin to flow once again. If this happens, check whether you are still correctly focusing your attention on the tanden. Correctly focusing your attention on the tanden should be viewed as the final goal. When you start to sit zazen, always check your body’s posture from top to bottom. Correct sitting leads automatically to correctly focusing your attention on the tanden, not vice versa. If you check and correct your overall zazen posture repeatedly during the practice session, you will also automatically be focusing your attention on the tanden. Initially you may be focusing your attention on the tanden properly for maybe only one or two minutes. The more often and more intensively you practice, the longer you will be able to prolong these phases.
The correct sitting posture
The right sitting posture is one of the many individual postures that make up the zazen posture overall. There are various sitting postures in zazen. For beginners, it is mostly the so-called kneeling (on the heels) position which is best suitable. For those who are more flexible, they can sit in the so-called Burmese position or in the half-lotus. The position in which you can initially sit quietly and comfortably for about 25 minutes is exactly the right position for you.
It does not matter which of the above positions you take. Find your own individual favorite position for yourself. It is also possible to practice on a chair or meditation bench. This is useful especially for those practitioners who have physical ailments. Should you experience prolonged pain, abandon the respective position immediately and get medical advice if necessary, should this pain continue over a longer period. This applies particularly to more difficult sitting positions such as, for example, the half or full lotus position. Such special positions should be practiced beforehand, because they put a lot of stress on the knees. If you absolutely want to sit in one of these positions, but perhaps cannot manage it yet, consult, for example, a yoga teacher, because these sitting positions are also used in yoga and in other similar disciplines. A yoga teacher can certainly give you good advice with regard to the preliminary practices. On the Internet, as well, there are video portals which provide interesting instructions to help you prepare to sit in these difficult postures. This book, however, has omitted such instructions.
The kneeling position
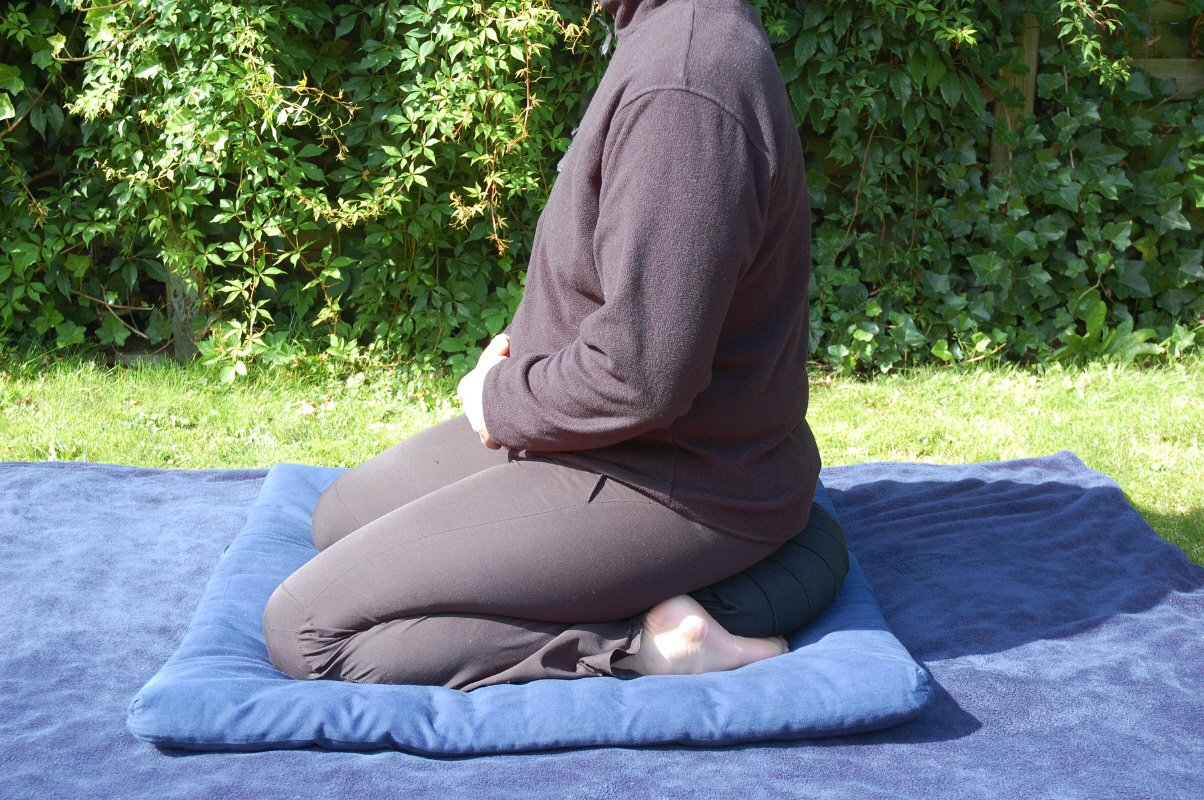
The kneeling (on the heels) position is called this because we kneel on our heels. Since during longer practice sessions this can be quite uncomfortable without a cushion, the zafu is used as padding. The zafu is placed between the heels and the buttocks. This kneeling position is most suitable for most beginners as a starting position.
Kneeling position
Initially hold yourself upright on your knees, with both legs side-by-side and pointing back. It is immaterial whether your feet are touching. Your shins are lying on the mat, the arches of your feet are on the floor, and your heels are naturally pointing upwards. Place the zafu on your calves and now sit back; the zafu automatically slides backwards. You are now seated in the final position, on the zafu, with your heels underneath.
|
For beginners, this position is already difficult to hold for the duration of the practice session. Often, pain in the instep appears after a short time already. This usually signals that foot muscles first need to be stretched. You can also sit in the kneeling position without a pillow, but you will then quickly feel pressure on your backside because you are sitting directly on your heels. Having some cushioning is more pleasant. However, even so the heels will, over time, once again cause an unpleasant feeling of pressure.
Another option is to place the pillow upright between your feet. Because you hold it in that position with your ankles, it does not slide backwards when you sit down. Using this method, you do not feel any pressure from your heels because you are sitting on the zafu and not on your heels. While sitting, you are holding the zafu with your feet. However, this can lead to tension in your legs. If you are using thicker cushions, you can also place the pillow between your ankles horizontally, with your legs positioned to the left and right of the cushion. Your legs may fall asleep, however. This is a sign that you are sitting too low. Your knees are bent too much, and no blood can flow through your legs. In this case, raise your sitting position. You also have the option of placing a second zafu on top of the one you are sitting on.
If you are sitting naturally in the kneeling position, your spine will be relaxed. It is by nature not exactly straight, but is instead gently curved in an "S"-shape. You should always maintain this natural position of the spine. Only then will you be sitting relaxed, automatically focused on the tanden, with your small of the back concave.
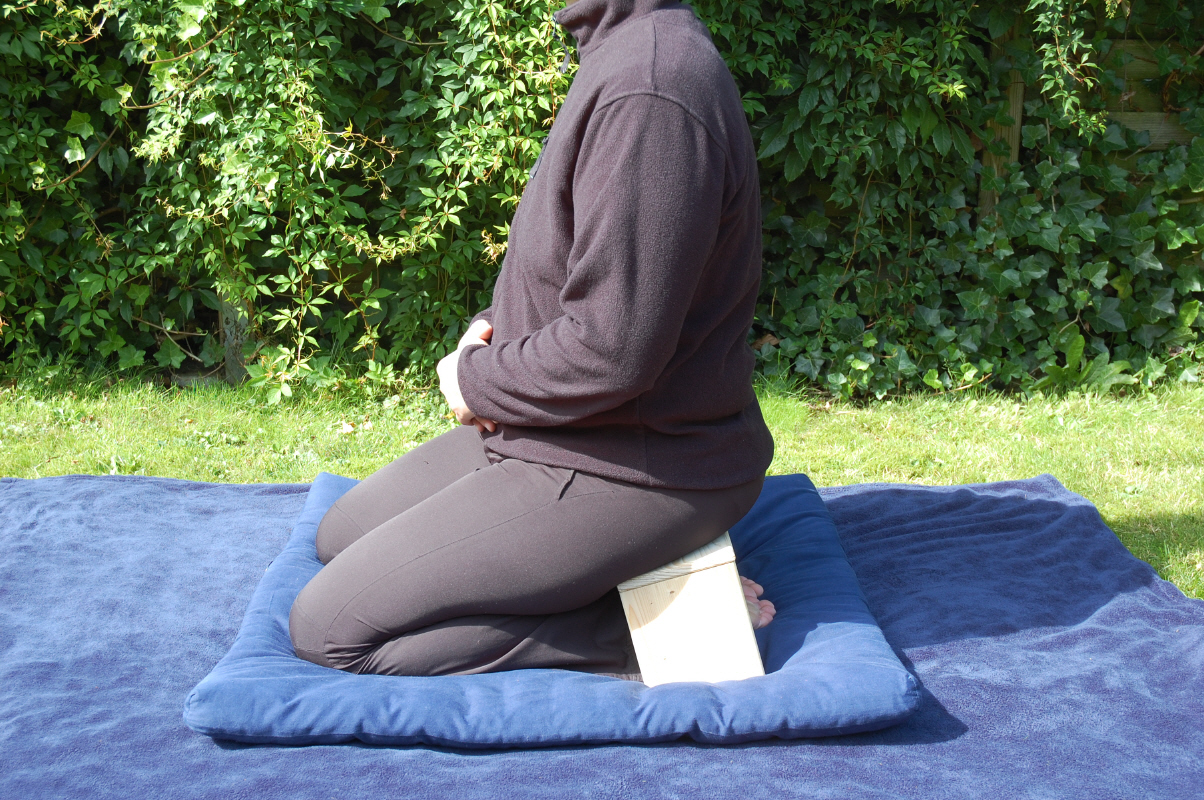
You can also use a meditation bench to sit in the kneeling position. The meditation bench is normally used when even the sitting position is not high enough for the student, the position is too unstable, or the student is in pain. The meditation bench raises and stabilizes your sitting position. For this, you need a standard meditation bench that you will use in place of the zafu, except that you put your legs under the bench. You are thus sitting on the meditation bench and putting your feet under the seat and through to the back. Nowadays there are many soft versions of meditation benches featuring cushioned padding.
|
For students who are not as flexible, or who cannot sit on a pillow or meditation bench due to physical difficulties or other medical reasons, they can sit in the zazen posture on a chair.
Sitting on a chair
Sit comfortably on the front edge of the chair, without touching the chair back. Hold your upper body upright, and do not lean too far to either the front or the back. Cross both legs, or have them parallel to each other; your knees are situated below the tanden. Only in this way will you be able to focus properly on the tanden.
The same general instructions for correct posture also apply to sitting on a chair. You can place the soles of the feet together, so that they are touching each other at the ankle. When doing so, your knees may be further apart, but the position becomes more stable. Just as when you are sitting on the meditation bench, sitting on a chair can be uncomfortable over time. Simply place a pillow or blanket on the chair if the chair cushion is not soft enough.
The Burmese position
The second possible position is the so-called Burmese position.
Burmese position
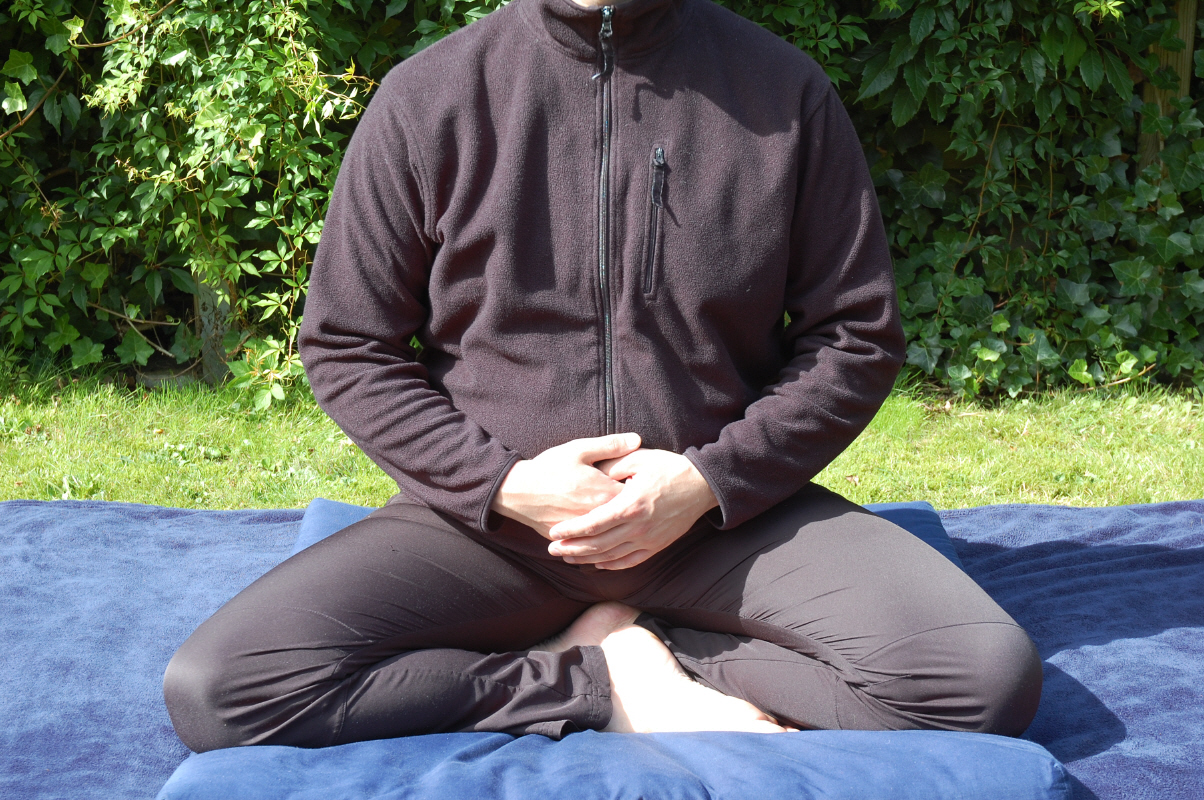
Sit with your backside centered on your zafu. Let your left leg naturally sink down to the floor. Then bend the right leg down to the outside as well; it should be situated in front of the left leg. Both legs are spread wide, the shins are parallel, and the feet may touch the respective upper or lower thigh of the other leg. The left foot is placed on the right thigh, the right foot on the left lower leg. Of course, you can follow the process starting with the right leg first. The soles of the feet naturally face upwards to a certain extent; they should not be one hundred percent parallel with the ground, but should naturally tilt inward to a certain degree.
|
In contrast to the kneeling posture, your legs now lie in front of you and you are sitting with your buttocks on the pillow. Both knees lie firmly on the floor with the soles of the feet facing slightly upwards and the upper portion of the feet lying on the mat. If you now look down on your feet, these, together with your knees, torso and tanden, form an imaginary triangle. Do not shift your weight too much onto your knees, because this would cause your upper body to automatically lean too far forward and you would no longer be focusing properly on the tanden. Your knees should serve only as a support; they make this posture stable. The Burmese position is not to be confused with the cross-legged posture familiar to us. In the cross-legged position, the knees are not touching the ground; this makes the position unstable, which would distract you from the actual meditation. Do appropriate stretching exercises to prepare for the Burmese sitting position.
The Half Lotus position
The half lotus position is quite difficult for beginners.
Half Lotus position
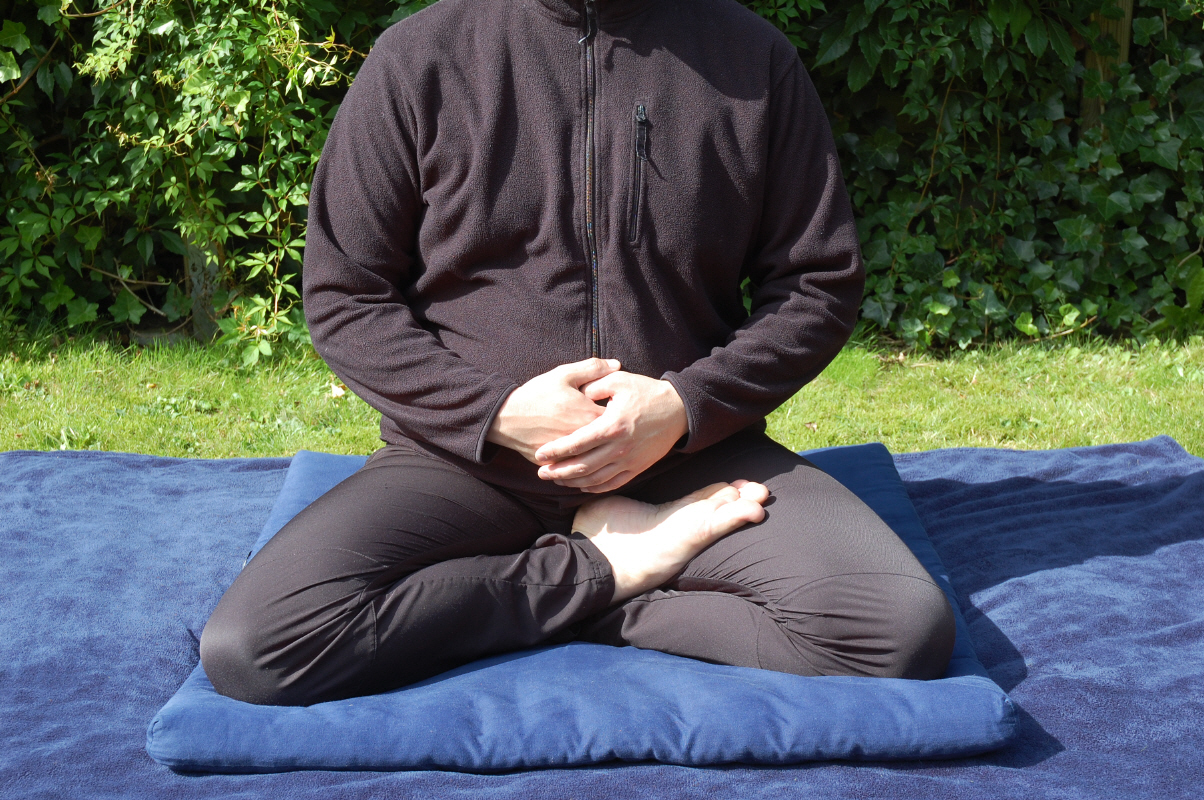
The half lotus position is an extension of the Burmese position. From the Burmese sitting position, pull the right foot upwards and place it on your left thigh. This naturally reduces the distance between the knees, because you must pull the right knee inwards to a certain extent in order to form the imaginary triangle again. Your right foot is half pointing upwards with the arch of your right foot placed on your left thigh. Your left foot mostly touches the inside of your right upper thigh; sometimes it even lies closer to your pubic bone. Of course, your other foot can be placed in the above position as well.
|
Here too, you should sit firmly on the zafu and your knees should both be on the floor, thus ensuring a stable posture. Do not focus on your knees, but on the tanden instead. You will achieve this by sitting upright on the pillow and not tilting either forward or backward. Again, your knees and the tanden form an imaginary triangle.
The Lotus position
The so-called lotus position is sometimes called the "full lotus position."
Lotus position
The full lotus position is the extension of the half lotus position. Here, your other foot is also drawn upward and placed on the opposite thigh. Proceed as in the transition from the Burmese position into the half lotus posture. While seated in the half lotus position, pull your left foot, which so far was positioned on the floor, upwards and place it onto your right leg. Your left foot is now resting on your right thigh. In the full lotus position, both feet are resting on the opposite thighs with the soles facing slightly upwards. The distance between your knees has consequently decreased even more. Pay attention to the imaginary triangle.
The Lotus position is not really recommended for beginners. You need to be very flexible to be able to get into it. Prior stretching exercises need to be done.
Since the correct sitting position is only one part of the overall zazen pose, the remaining elements will now be examined more closely.
The correct head position
If you hold your head properly, your upper body will also automatically be in the correct position. If you position your torso correctly, you will also automatically throw your strength into the tanden correctly. Hold your head vertically upwards, as if it were gently being pulled upwards by an imaginary string. This causes the upper body to automatically straighten up. If you slump, you will get tired. Do not get tense in this position; it is intended only to straighten the upper body. Do not pull your head upwards in an exaggerated fashion, since this can result in neck pain. You should keep your head straight. If you can sit in front of a mirror and look yourself in the eyes, you have found the correct posture. Your face is not lowered, but points straight forward, while your head is being pulled upwards by the imaginary string at its crown.
The correct position for your gaze
Although in zazen the head is held straight, the gaze is focused downwards. This creates internal stability. If you look at the ground, you will feel secure and grounded. For example, if you were to look upwards over a longer period of time, you might become dizzy because you would lose your sense of being grounded. Therefore, always focus your gaze on the ground. Keeping your head straight, look at a spot about three feet in front of you. When doing so, lower your gaze and half-close your eyes. Through your half-closed eyelids, gaze steadily at the ground and focus on one spot, for example, a piece of lint on the carpet. By gazing steadily at one spot, you will concentrate better and not be distracted. If you open your eyes too far, they can dry out and your body will produce more tears. If your lids are closed completely, you can become tired and fall asleep. To avoid this, you should find the right distance for a fixed spot to gaze at. If, when focusing on the lint on the carpet at a distance of one yard, your eyes are still open too wide, fix your gaze on a piece of lint 2½ yards away. Do not suppress your natural desire to blink.
So, direct your gaze at one spot and focus on it. Later you will certainly start to focus your eyes automatically on infinity. This is similar to a camera lens, which can be adjusted from a sharp focus to a fuzzy one. The intention is not that you should go cross-eyed. You are no longer focusing on one spot, but are directing your gaze inward at infinity, and the focal point itself will be blurred. This is later quite useful for concentrating even better.
The correct hand position
During zazen practice, you should keep your hands slightly away from your body. Some people simply place their hands on the tanden. This can cause you to perceive the stimuli of the lifting and lowering of your abdomen, thereby distracting you from meditating. If this is the case for you, you should select the classic Zen hand position.
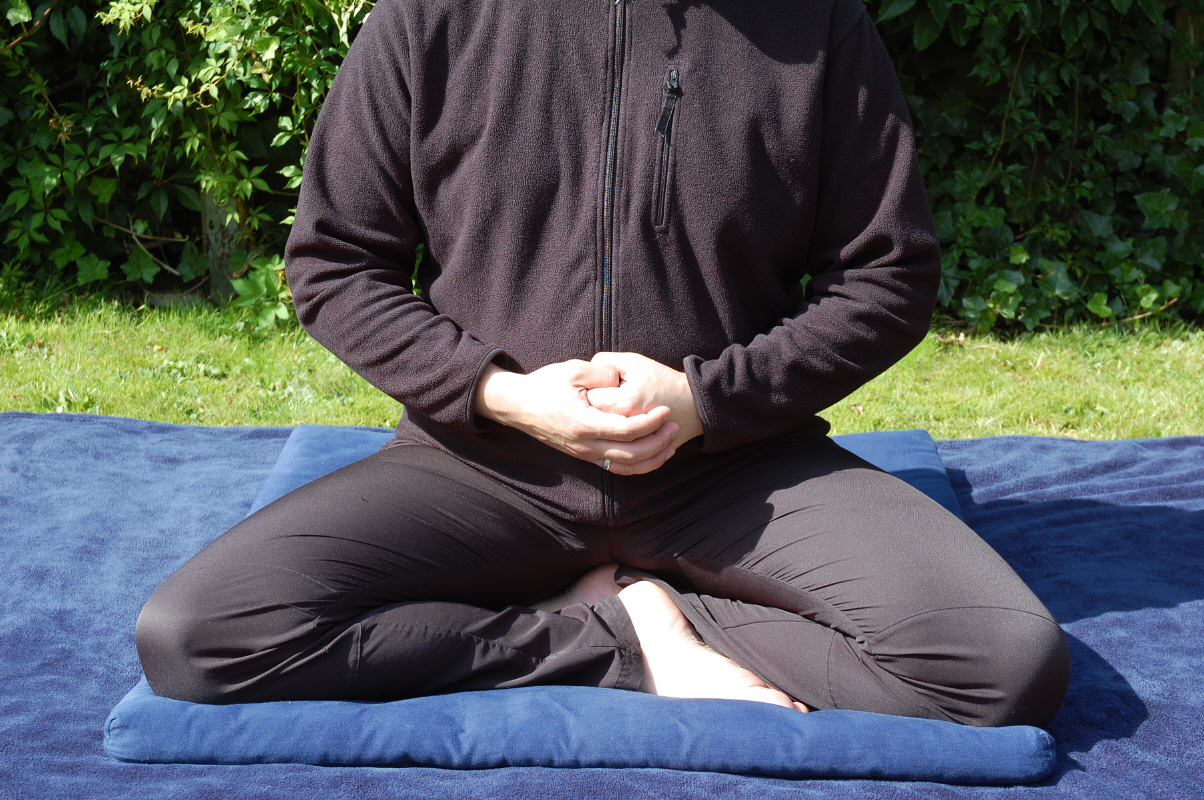
Classic Zen hand position
Your arms hang down naturally, with one hand, palm-up, lying comfortably on top of the other, and the two thumbs gently touching at the level of the navel. The backs of the hands are facing down, and the bottom hand gently forms a hollow with the other lying in it. The thumbs are held loosely above the resting hands and touch each other at their tips horizontally, almost imperceptibly. The upper arms do not touch the torso. The elbows point outward.
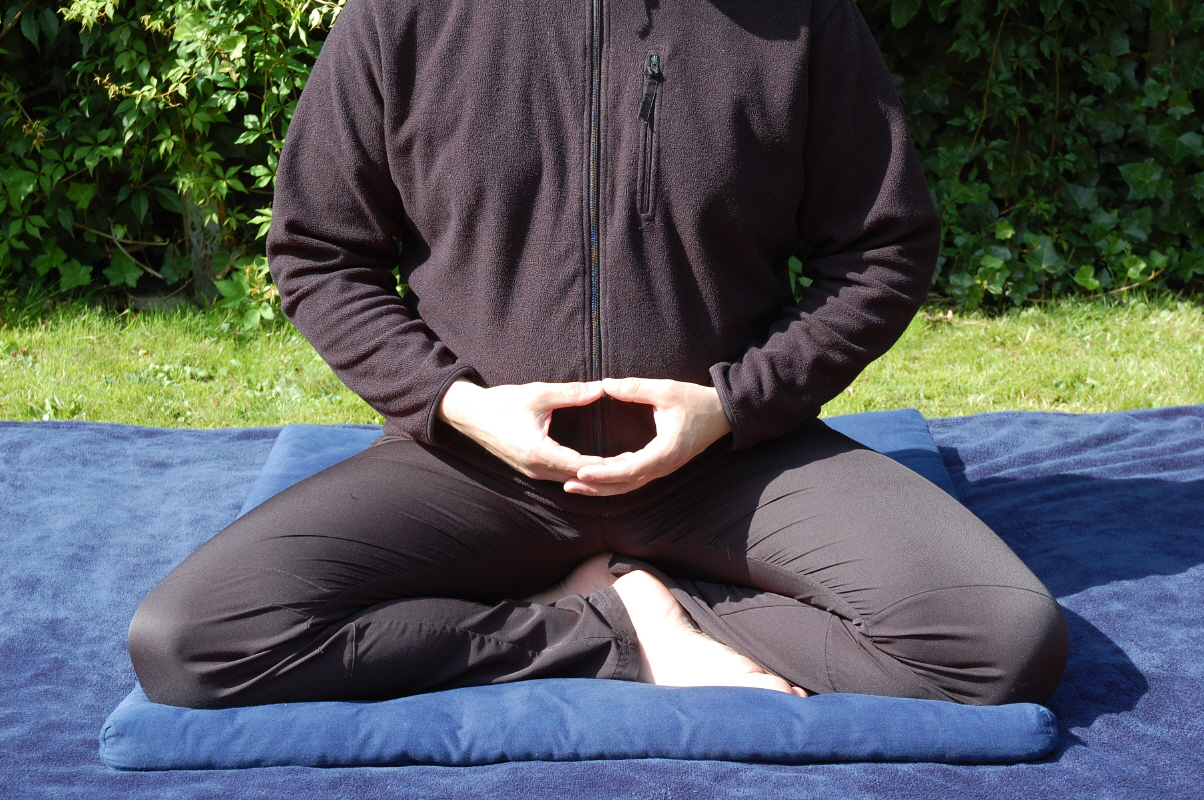
|
Your two thumbs should just barely touch, without any pressure. The other fingers are held together quite loosely. It does not matter how you hold your hands in terms of which hand is underneath and which is on top. You should not rest your hands on your thighs or heels. If, during meditation, you feel any pressure in your hands or on the points of contact of your thumbs, this is an indication from your body that you need to relax your posture. Pressure creates an unpleasant feeling in the body, which then creates mental attention, which, in turn, can distract your attention from the meditation. If, during meditation, you notice that your thumbs are pointing upwards, this is a sign that you have unconsciously tensed up or want to control something. If your thumbs are drooping, this indicates fatigue. In such cases, put them back into the horizontal position and check your overall posture. The edges of the hands, which in this hand position are pointing towards the body, are gently touching your belly at the level of the navel.
There are a few more hand-positions:
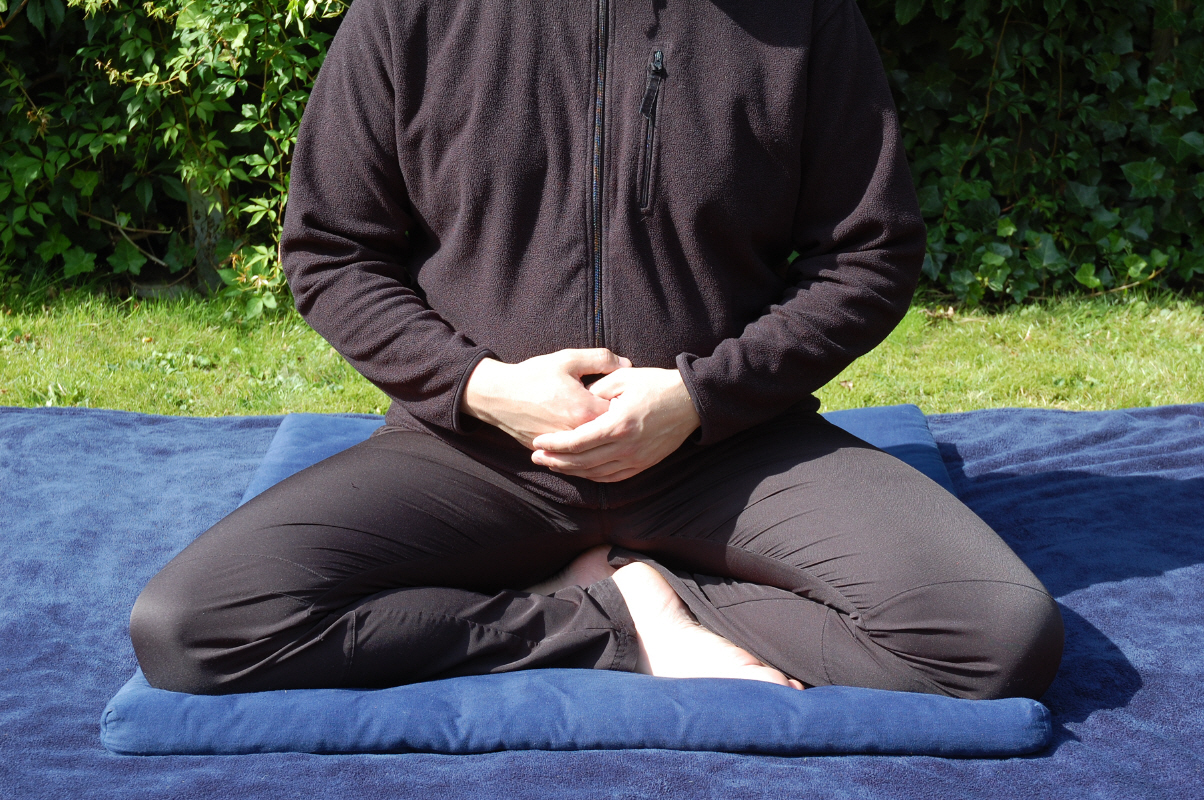
|
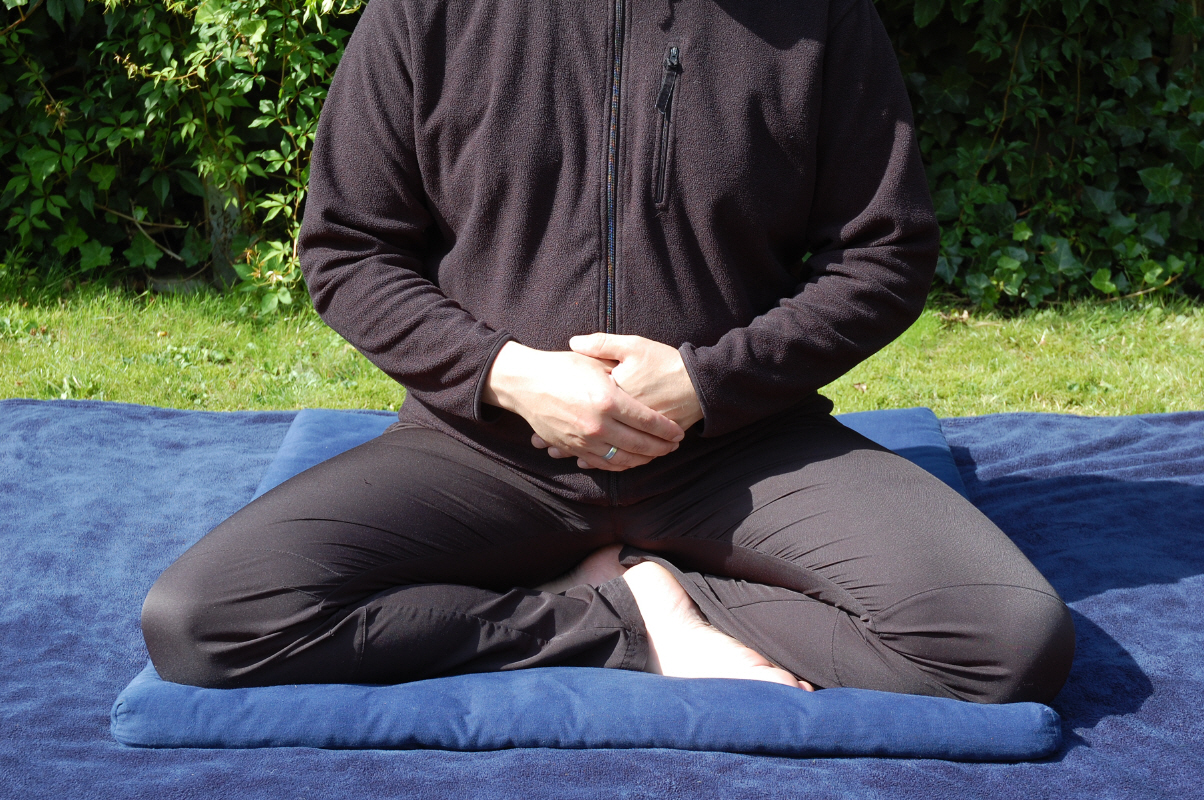
|
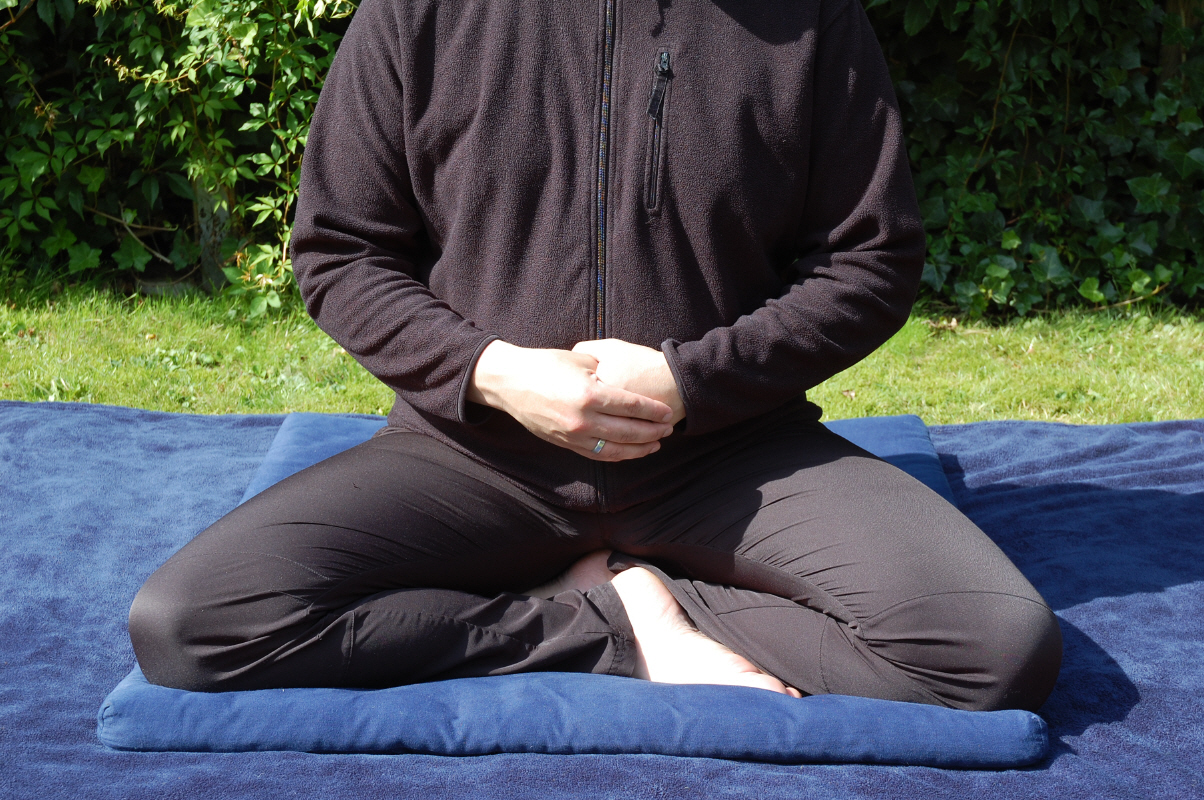
|
|
The correct way of breathing
Zen distinguishes between two modes of breathing: chest breathing and abdominal breathing. The latter is crucial for zazen.
Chest breathing
Chest breathing is generally well-known. If, for example, you participate in strenuous sports, you will start chest breathing almost automatically, because you must repeatedly and quickly exhale and inhale a large volume of air. Unfortunately, chest breathing has become so widespread among us that we also unconsciously breathe this way during periods of rest. Chest breathing is done in the upper part of the body. You breathe, as the name implies, with your chest. In this process, the chest rises and falls. This happens by virtue of the fact that during an inhalation, you unconsciously pull your diaphragm up. If you breathe using chest breathing, you are breathing shallowly. Shallow chest breathing will stimulate the flow of thoughts; therefore this chest breathing is not suitable for zazen.
Abdominal breathing
In contrast to chest breathing, during abdominal breathing you push the diaphragm down. During inhalation it is not pulled up, but remains instead in the exhalation position. In abdominal breathing, during inhalation the diaphragm provides slight resistance to the abdominal muscles which are contracting; since the diaphragm does not rise but instead presses down, it produces a slight counter-pressure. In this way you inhale the air into your belly and breathe into the abdomen. The belly should not be extending outward during inhalation; instead, the air should be pressed down in the direction of the tanden. The belly thus expands outward only slightly. If you extend your abdomen too far out like a balloon, you will go into a swayback position and decrease your focus on the tanden.
Natural abdominal breathing automatically happens through the perfect zazen posture. A big mistake that students make is to tense the abdominal muscles artificially in order to try to throw their strength into the tanden. That is wrong, as this can cause back pain. However, if you sit correctly, tension almost automatically arises in the tanden. Hold the diaphragm down, that is, slightly tense, and breathe directly into the tanden. Tensing the diaphragm is not to be confused with tensing the abdominal muscles. The abdominal muscles are totally relaxed. Only the diaphragm is pushed down into the belly during inhalation, and is thus slightly tensed. This tension is created not in the abdominal muscles, but in the diaphragm itself, thereby causing the tension in the tanden during inhalation. Through this natural tension in the tanden, the belly cannot extend completely outward, and the breath goes deeper into the tanden.
Abdominal breathing requires a great deal of practice, because breathing this way is not very common for us in the West. It is not easy for us to keep the diaphragm down when we inhale without our abdominal muscles tensing up and us reverting to chest breathing.
After some practice, and if you are doing the abdominal breathing correctly, you will notice that you no longer need full lung volume as you do during chest breathing. After a short time, you will find this abdominal breathing normal and you will maintain it in your everyday life. You will develop a deep sense of strength and spiritual power through abdominal breathing.
In abdominal breathing, exhalation occurs naturally. You do not need to pull in the abdomen; simply allow the air to escape, but keep the slight tension in your diaphragm, holding it down. Every now and then while doing this type of breathing, you will take a deep breath in the form of chest breathing. This is natural, and it happens off and on by reflex.
You should practice abdominal breathing, and the above-mentioned individual positions, again and again. If you are able to maintain the sitting, head, gaze, hand positions and manner of breathing without any mistakes, you will automatically also find yourself in the perfect and complete zazen posture.